If your Windows PC is feeling sluggish, cluttered, or you want to tidy up apps you no longer use, uninstalling programs via the classic Control Panel is a reliable method—especially for traditional desktop apps. This guide covers how to access the right place, remove programs safely, handle optional Windows features, and deal with stubborn uninstallers, all with practical tips along the way.
What you will need
- Administrator rights: Many uninstalls require admin privileges.
- A few minutes per program: Some uninstallers take longer, huge suites.
- A reboot: Some removals will not finish until you restart.
Step 1: Open Control Panel
There are several methods to open the Control Panel in Windows 10/11:
- Search: Press the Windows key, type “Control Panel,” and press Enter.
- Run box: Press Win+R, type
control, press Enter. - Power user menu: Right-click Start > type “Control Panel” in search (not always pinned by default on Windows 11).
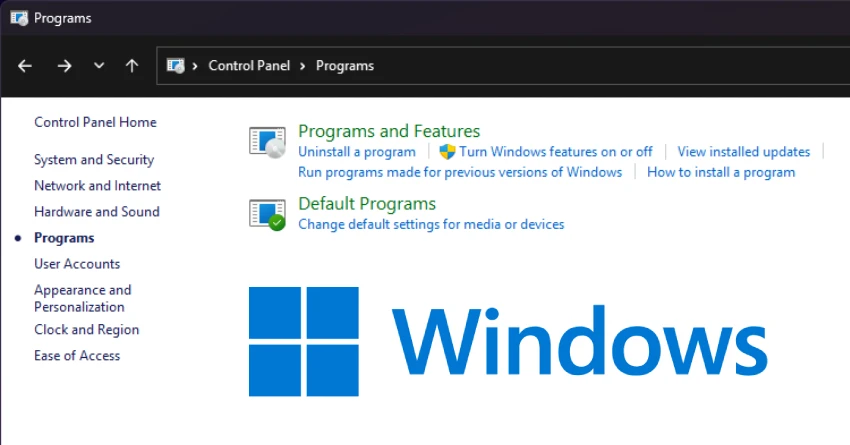
Step 2: Go to Programs and Features
From the Control Panel home:
- If using Category view: click Programs > Programs and Features (labeled “Uninstall a program”).
- If using icons view, click Programs and Features directly.
This is the classic interface for managing traditional desktop programs (Win32/MSI/EXE installers). You will see a list of installed programs with columns like Name, Publisher, Installed On, Size, and Version.
Step 3: Identify what to remove
Before you uninstall, quickly evaluate:
- Do you still need it? Consider what the program does and whether a dependent app relies on it.
- Publisher and version: Useful for spotting toolbars, trialware, or outdated utilities.
- Installed On: Sorting by date can help identify recent additions that may be causing issues.
- Size: Large entries may free up more space—but size alone is not a reason to remove essential components.
Caution: Be careful with drivers, runtimes (e.g., Microsoft Visual C++ Redistributables), or anything with “Driver,” “Framework,” or “Runtime” in the name. Removing them may break other software.
Step 4: Uninstall a desktop program
- Select the program.
- Click Uninstall (or Uninstall/Change, or right-click > Uninstall).
- If a vendor uninstaller appears, follow its prompts. Common options:
- Uninstall: Removes the program.
- Modify/Change: Lets you add/remove components without fully uninstalling.
- Repair: Fixes files and settings without removal.
During the process:
- Close the app if it is running.
- Save work in other programs in case a restart is required.
- If prompted to restart now or later, finish uninstalling other apps first, then restart once at the end.
If the button is greyed out or does nothing, see the troubleshooting section below.
Step 5: Turn Windows features on or off (optional components)
Not everything appears as a standalone “program.” Some components are Windows features:
- In the left menu, click on Turn Windows features on or off.
- Uncheck features you do not need; click OK. Windows will apply changes and may require a restart.
Common examples:
- .NET Framework: Required by many apps—avoid disabling unless you know you do not need it.
- Hyper‑V, Windows Sandbox: Virtualization tools—safe to disable if unused.
- SMB 1.0: Obsolete and insecure—should remain off unless necessary for legacy devices.
Tip: This area is for Windows-managed features, not third-party apps with their uninstallers.
What about Microsoft Store apps?
Microsoft Store (UWP) apps often do not appear in Programs and Features. To remove them:
- Open Settings > Apps > Installed apps (Windows 11) or Apps & features (Windows 10).
- Find the app, click the menu next to it, and choose Uninstall.
This guide focuses on the Control Panel, but knowing this distinction helps when you cannot find an app in the list.
Cleaning up leftovers
Most uninstallers remove the app’s files and shortcuts, but you may want to tidy up residuals:
- Program folders: Check
C:Program FilesandC:Program Files (x86)for leftover folders with the app’s name. If unrelated to anything else, delete them. - AppData: Advanced users can check
C:Users<YourName>AppDataLocalandRoamingfor remnants. Only remove folders you are certain belong to the uninstalled app. - Startup entries: Press Ctrl+Shift+Esc > Startup tab, disable any leftover entries.
- Scheduled tasks/services: Uninstallers may occasionally leave services or tasks. Use Task Scheduler or Services (
services.msc) to verify. Only modify what you recognize. - Disk Cleanup/Storage Sense: Use built-in tools to free up temporary files.
Avoid manual registry edits unless you know exactly what you are doing. Deleting the wrong keys can destabilize your system.
Troubleshooting stuck or missing uninstallers
- No Uninstall button: Ensure you are using an admin account. Try right-clicking the Control Panel icon > Run as administrator.
- Uninstall entry missing: Reinstall the program over the top, then try uninstalling again. Many uninstallers rebuild missing entries.
- Uninstaller crashes or hangs:
- Reboot and try again.
- Boot into Safe Mode and try uninstalling.
- Temporarily turn off antivirus if it is interfering (re-enable afterward).
- Program is partially removed: Use the vendor’s dedicated cleanup tool (many security suites and drivers offer these).
- Windows Installer (MSI) issues: If the uninstall complains about a corrupt installer, run System File Checker, then try again.
- Restore point: If the uninstall caused problems, use System Restore to roll back to a point before the change.
Note: Old third-party tools that forcibly remove MSI registrations can cause more harm than good. Prefer vendor-provided tools or reputable uninstallers and always create a restore point first.
Modify vs. Repair vs. Uninstall
- Modify/Change: Add or remove specific components (e.g., language packs, plugins).
- Repair: Fix corrupted files, registry entries, or settings without removal.
- Uninstall: Completely removes the program and its components (user data may remain unless the uninstaller offers to delete it).
If you are troubleshooting a broken app, try Repair first; if that fails, Uninstall and then reinstall the latest version.